
Showing posts with label design. Show all posts
Showing posts with label design. Show all posts
Sunday, April 29, 2012
Threadflip.com
What I like about threadflip.com is it has style. The way it is set up makes me want to browse through the photos of cute high end current clothing that is not inexpensively priced, but affordable, compared to shopping new. Also, the photos give you ideas of how to put outfits together with the clothing each person is selling. And you can sell, too! Or try to before you hold your own Bitch and Swap, which, let's face it, is probably still a lot more fun...


Wednesday, April 18, 2012
RE-Fashion
My cousin Kim sent me this amazing article that has pretty much everything you need to know about one of my favorite subjects: Re-fashion! It even has a link to a woman who made a dress out of a table cloth! Sound familiar?
Thank you, Fair Companies.com!
Wednesday, December 29, 2010
I Played My Drum For Him
 Ask the Little Drummer Boy. He gave of what he had, and never gave up when he couldn't afford to go to the mall and spend hundreds of dollars for brand new gifts for the baby Jesus.
 Ted and I looked around to see what we had this fall and saw things we've collected: Champagne and wine corks (no surprise there), leather scraps, and feathers from the birds in our neighborhood: wild turkeys, bluejays, Canadian geese, and tufted titmouse. After experimenting with a few different prototypes, little Christmas Tree ornaments emerged from our combinations and the Pocono Angel was born.
The next challenge was sending them in the mail without ruining the feathers and by using only recycled brown paper bags and cardboard.
Soon, we had over 30 made and our family and friends now had little personalized ornaments to hang on their tree.
Pa rum pa pum pum!
Saturday, November 6, 2010
Dulcinea Beauty Tip #1: The Aldonza Manicure

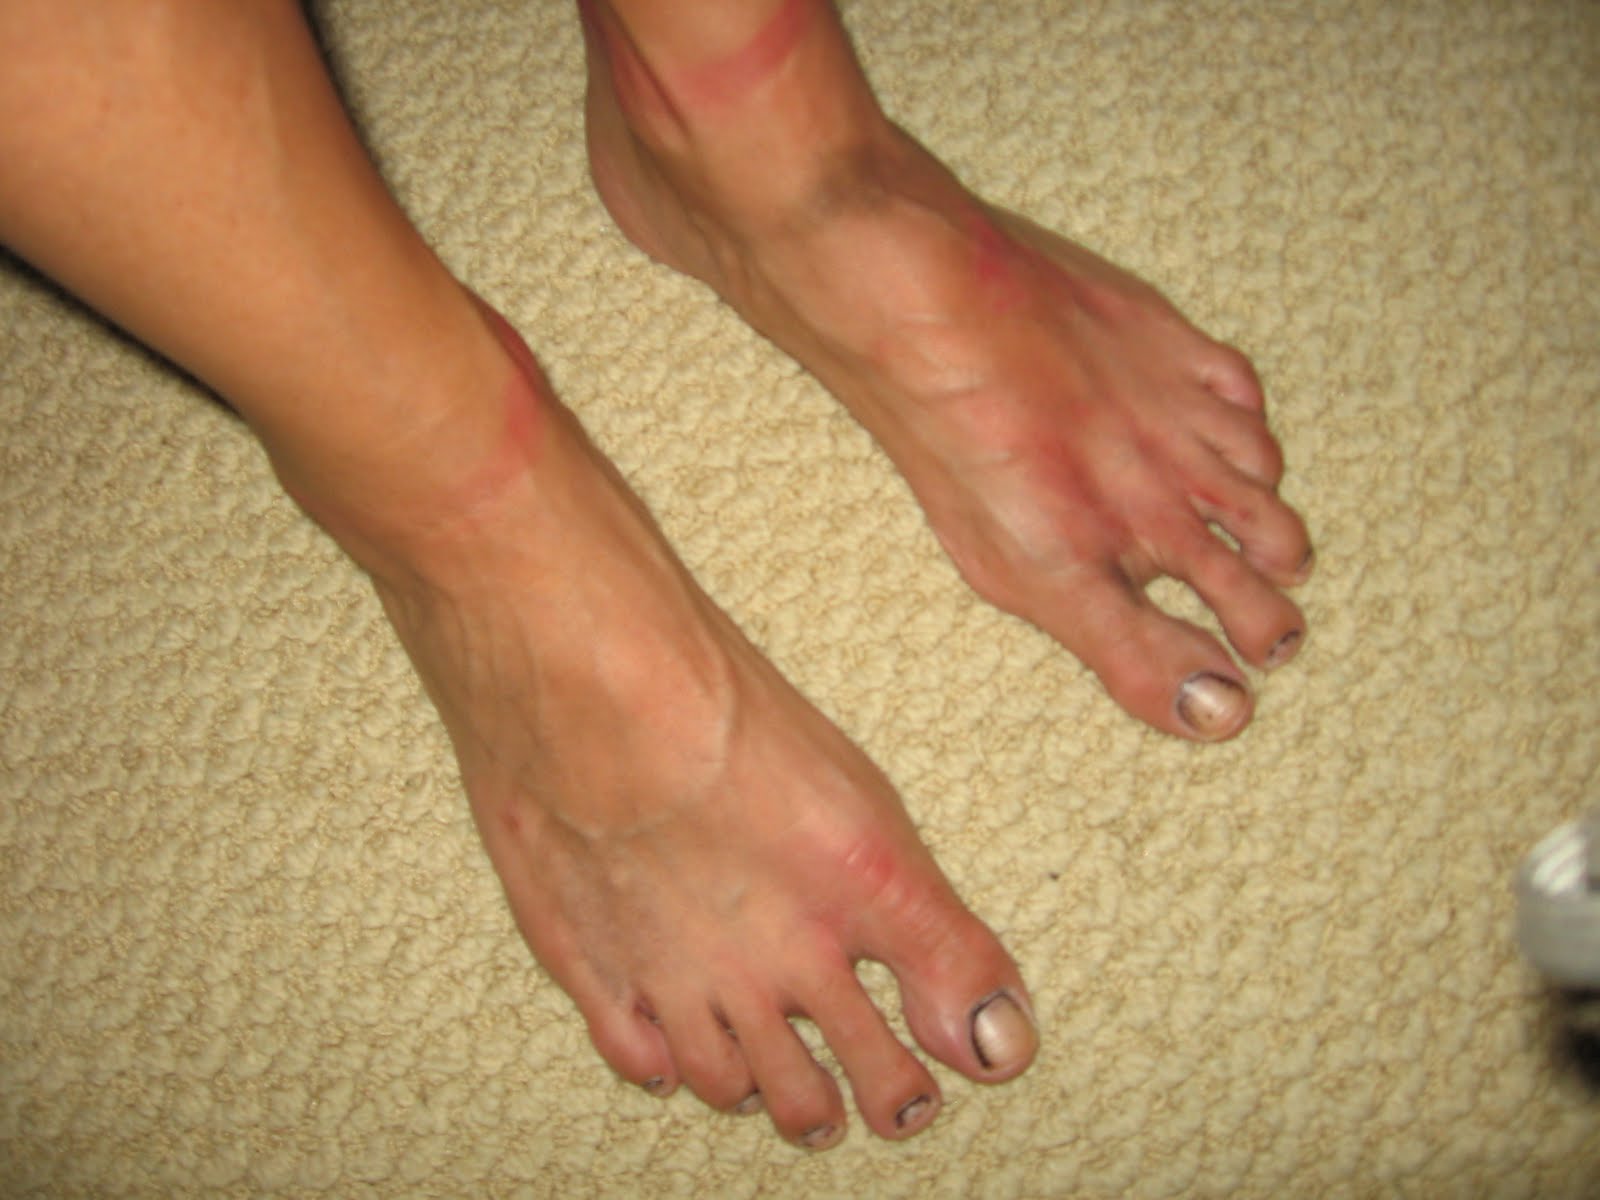 Okay, this is not really a "beauty tip" and this post would have been better timed before Halloween, but I came up with this idea when I was looking for details to make myself really dirty at the beginning of the show, Man of La Mancha. To become "a creature who'll never do better than crawl", I wanted to be covered in years of gutter grime so my transformation would be more dramatic. I knew we would be "getting dirty" by covering ourselves with burned cork before each show (see upper right photo with Lauren Ford, "Antonia"), but would it stay in the cracks of fingernails and toenails?
 For about a year now, black has been back as the trendiest nail polish color, and not just for Emo, Goth or Alt Rockers. During rehearsals, I was wearing black on my nails and as it wore off between manicures, I wondered if I could wipe it off in a way that it looked like residual dirt. I must admit, I was inspired by the makeup in the Lord of the Rings movies (so many closeups of Frodo and the ring couldn't reveal clean hands) and was happy to know that this effect wouldn't require frequent applications of black shoe polish or something worse.
- Apply one layer of black nail polish all over nails (and toenails if feet are bare).
- Allow to dry.
- Soak paper towel or toilet paper in nail polish remover and wipe nails down, avoiding the cuticles, leaving polish on edges only.
Soon, other cast members wanted this "Aldonza Manicure" to add details to their dirtiness. (Pictured here are Sal Sabella, "the Padre", and me out after a show, showing off our gnarly nails)

Who knows? Maybe we'll start a whole new fad!
Wednesday, June 9, 2010
More Divawear...
 Another performance at Symphony Space with some amazing celebrities (I performed between a video of Stephen Colbert and Leonard Nimoy!), another reason to create another "Divawear" design.
 This was a top I made from 2 identical silk scarves that I found in a ten cent bin at a thrift store in California (I bought 10 of them, stay tuned for the gown...) and then sewed together. I added a draw string and my Divawear tag... et voila! "Wow" comments from Jane Curtin, Carmen de Vavallade, and Eugenia Zukerman!
Monday, November 16, 2009
Actor Crafts

ActorCrafts is here, just in time to start your holiday shopping!
Shop for jewelry, clothing, and gifts this Saturday November 21st at the Holy Cross School (332 W. 43rd St. between 8th and 9th Ave.). It's all designed and created by New York City actors (it's good to multi-task!) and the festive sale never disappoints!
Shop between the hours of 10:00am and 6:00pm.
Sunday, November 8, 2009
T-Shirts Re-Mix
 T-Shirts. One symbol we'll leave behind as our legacy, punctuating our lives with events and eventually fill up the bottom of our drawers in faded piles of our history.
 According to the PBS documentary, T-Shirt Travels, literally tons of our discarded clothing is shipped overseas to Africa where their sale has put the local clothing manufacturing out of business. In this striking documentary, African children were shown wearing oversized t-shirts depicting M-TV and brands of beer. It made me think that there must be a way to reuse and recycle our T-Shirts in a less destructive way.
In my previous post, Your Own Gypsy Robe, I wrote about a way that I can still wear my Show T-Shirts.
But now, new (and often overpriced) t-shirts have the look of old, worn favorites so why not make your old, worn favorites into wearable fashion? Or take your husband's/boyfriend's/brother's old white t-shirts and dye them to the color you want? (See you earlier post, Do or Dye)
The first example pictured is a North Shore Animal Shelter t-shirt that we got when we adopted Maya. This was the easiest fix as it was a size Medium and I shortened the sleeves (cut at an angle with the longest part at the top of the shoulder), cut out the neck, and then cut off the hem and turned it into a belt. One of the best things about t-shirt material is that it doesn't fray, even when washed. This means hems are optional.

To make an oversized shirt into a more form fitting tee, cut off the sleeves right at the hem. Leave the bottom hem, neck, and sleeve hems intact. Then take a shirt that you like the fit of and lay it over your favorite. (see photo below) Fold the sleeves in along their hem and cut along one side of the old t-shirt about an inch outside of the line of the t-shirt on top. Fold it in half and cut the other side to match. Shorten the sleeves by cutting parallel to and in from the cut that was the seam. Make the bottom part of the sleeve the shortest. Pin the newest sleeve cut right sides together to the shoulders (over the shoulder seam) and sew (the most difficult step). Then turn the bodice right sides together and stitch up the new side seams, making sure that hems match.
Now you have remaining fabric that can be used to create your very own design. Shown here is a leaf design that I hand sewed diagonally across a purple tee, a t-shirt that my husband was getting rid of that I dyed yellow, used the above process to make it more fitted, and created a long wrap-tie from the remaining material, and my favorite, a self-dyed tee (red) that I made into a fitted tank, skipping the sleeve step, and then machine-sewed the remaining material in a design on the front and shoulders. (rock and roll under a black pinstripe sportscoat)


Now cutting up your old t-shirts isn't reserved to the fringed and beaded looks of the early 90's (Yikes! What were we thinking?). With a little imagination and minor abilities with a needle and thread, the sky's the limit.
Sunday, August 16, 2009
Recycling in Urbanopolis

If Suspended Cirque can create an entire costume plot for their Aerial multi-media Circus at Galapagos out of reused, recycled, and found items, we can all find ways to incorporate such creativity into our own daily lives.
I'm playing violin as the character of the dying Phoenix in their spectacle Urbanopolis this weekend (to sold out shows!) and I am amazed each days at the attention to detail that Joshua Dean has put into his costume design (FYI he is also the co-creater, director and a lead performer/aerialist/dancer). Using newspaper, feathers, toille over exaggerated hoop skirts, Suspended Cirque incorporates leotards and mixes and matches from previous shows to create new looks. They bring renaissance living to a new level!
I just play the violin...
Sunday, March 8, 2009
Wedding Wildflowers
 If you have started your wedding planning, then you've already discovered that there is a magic word that will automatically quadruple any price quote: "Wedding"
But if you're like me, you don't feel comfortable lying. Or at least you're just really bad at it.
Either way, there are ways to cut costs and you can choose all of them or just some. No doubt, you've started to prioritize about what you don't want to skimp on.
Now I love flowers and greens, but with our limited budget, I decided early on that I was not going to hire a florist. At all. With a July wedding in the Poconos, I knew that there would be enough foliage in the natural setting that we had chosen.
First, I obsessed. Every time we were driving around near our location, I noted flowers: Where they grew wild, which ones fit our color palate (cranberry and butter yellow) and kept a look out for interesting textures, all growing in fields and along roadsides (never someone's garden! Hello!). There were so many varieties, some I'd never noticed before.

Next, I gathered some and made my first practice bouquet. It was not only beautiful and simple, but seemed to reflect the setting we'd chosen much more than store bought roses.
Then, I gathered my Renaissance Girls.
When shopping for other decor, I found the perfect cranberry velvet ribbon and my magical sister-in-law Marie (who also decorated the arbor, pictured here) bought artificial berries that represented the wild blueberries that Ted and I often pick together (We decided real blueberries could stain...).
The day before the wedding, I put three oversized vases with water, two pairs of garden shears, and my friend Elizabeth (now on tour in Xanadu. Hi, Elizabeth!) into the car and drove around the countryside to the places I'd remembered had the flowers I liked. We spent about an hour filling the vases with ferns, tiny daisies, and
beautiful wild flowers. Then we put them in the cool basement where they stayed fresh overnight.
The next day, Marie arranged most of the flowers into vases for the reception and Elizabeth and I created the bouquet that I would carry down the aisle and tied it with the ribbon. It was a perfect compliment for my antique home-made linen wedding dress and Ted's pinstripe grey suit.

Now, some people want to hire a florist and avoid this extra work, but in the end, picking and arranging flowers with my girls was an incredibly wonderful way to spend the morning before my wedding.
And let's face it. So was knowing that I saved thousands of dollars.
Framed

Do you have stacks of interesting prints, artwork, or old photos and sad, empty walls?
You're not alone. Frames are expensive! And who knows how to make mats and cut frames to size? Not me. But you can get creative (and get rid of the stacks).
When you're at a yard sale, antique shop, or thrift shop, look for fabulous worn old frames with or without paintings or prints. They don't have to be the exact right size or have glass intact. I had a stack of amazing black and white photographs that my Grandfather took on his travels in the 1950's. I found this amazing collection of old frames at a yard sale (all for about $20) and added them to a few I had already acquired over the years. I don't recommend cutting the photos to fit the frames, but in this photo, you can tell I got creative with how they stay in the frames (strings, even leaving the backing visible). Notice they are all different, but have a similar color palate (gold, earth tones, and terra cotta). The black and white travel theme helps make them a unified collection as well.
Once you get your prints in the frames, lay them out on the floor first and experiment with different arrangements. Put the most striking pieces at eye level and in the center of your wall and then think creative cluster, not spreading out to fill the wall.
Don't let your walls be sad! It's time to frame.
Thursday, February 12, 2009
Do... or Dye!

Sick of your clothes?
Or did you find the perfect blouse but it comes in only white or off-white?
Here's the answer.
Don't pass them over. Dye them!
A box of RIT Dye or Tintex Fabric Dye (available at most drug stores, grocery stores, or everything stores like Target), costs less than three dollars. The only tricky thing is finding a large enough pot in which to dye your clothes without dying your kitchen at the same time! Once you've tackled that obstacle, you will be surprised by the possibilities!
The dress pictured here (bought at a thrift store in Washington State) was a strange 80's bright blue that I knew I'd never wear. After dying it in a vat of Wine colored Tintex (and adding a beaded belt high up on the natural waist), it became this amazing purple that had a wonderful sheen to it. At the same time in the same batch, I dipped dingy slips that I've since worn to weddings, for performances, and as a raspberry sundress on a summer day. Great tip: Favorite used-to-be-white t-shirts can be salvaged and given a new life by dying them.
For the truly adventurous, try mixing and matching colors. In general, it works like water colors and the color wheel: blue and yellow make green, red and blue make purple, yellow and red make orange etc. but it's definitely not an exact science, which I sort of love!
When it comes to dying, fabrics are like men. If they're synthetic and fake (polyester and spandex) the love won't stick (color will be light and inconsistent). Natural weaves (cotton, wool, nylon, silk, rayon), however, fall quickly and deeply and a tumble in high heat (the dryer) will set them forever.
Follow directions on the box and go ahead and choose a bunch of stuff in your house to dye at one time. Why not see how color can spruce up your life... and for a mere three dollars?
Saturday, February 7, 2009
My Ikea Hack


Most people don't guess it, but about fifty percent of the furniture in our New York apartment is from Ikea.
The reason people don't guess it is that our style isn't ultra-modern with geographic shapes and bright solid colors, typical to the European apartment look.
One of my favorite pieces of furniture is our computer desk, which I fondly call "the office" because it can be closed off to hide our computer and files when we don't want to be reminded of work.
Now, Ikea makes a desk that fits this description (ALVE), but it angles out from a corner and in our apartment, it would reduce the amount of room for our dining room chairs. Plus, we wanted to customize it in our own way.
My husband and I bought the LEKSVIK armoir instead for $299, $100 less than the computer desk. It only comes with one movable shelf, but he easily cut two other boards down to fit and then attached the rolling computer keyboard shelf that I think is available in the IVAR shelving line (for about $30) under the shelf that was included. Below, we set a drawer unit that I already had that provides two storage drawers and a surface on top on for additional storage.
The computer monitor and speakers are on the main shelf with the printer one shelf above. Any of the magazine files that Ikea sells are better than a file cabinet in my opinion and hanging inside our LEKSVIK armoir door is a basket caddy that I found at a yard sale and attached with screws. It holds our pencils, pens, and other utensils. Phones and lights are easily attached inside and with the doors closed, you can almost forget about the trappings of the twenty-first century.
Until you feel compelled to share your Ikea hack with other like-minded re-mixers and stay up all night posting about it!
Check out ikeahacker for more fabulous ideas...
Monday, January 12, 2009
Wedding Shopping
 It's not too early.
In fact, it might be the tail end of the end of Holiday Clearances already so get out there!
Things to look for now, 'cause you will wish you'd found them at a bargain price:
- Strings of white tiny Christmas Lights (12 strands, depending on the size of the reception hall) Ted's friends Greg and Chris made our hall look that much more festive the day of the wedding. I felt like the stars had come down into our little celebration!
- Various Ornaments that relate to your theme (Haven't chosen a theme yet? It's time!). If red, gold, or green is one of your colors, the easier for you!
- Plates, cups, napkins, utensils.
- Favors.
- Faux Greenery, Garlands, and Wreaths.
- Table runners and cloths.
Pictured above are the tiny glass love birds I found in bulk in an art store sale. I used them as favors as birds are a theme in Ted's and my love of nature. The sunflowers were made as curtain tye backs and I used them to enclose scrolled ceremony programs. Our colors were cranberry and butter yellow.
All of the items you find at these post Holiday Sales can be used in a wedding without people knowing that they were meant for Christmas Decorations. Use your imagination and the sky's the limit!
Myles of Style
I never watched Design Star, but one of the winners, Kim Myles, has her own show now on HGTV and she's my new hero.
The show I caught yesterday had her making a very chic chandelier out of clear plastic Christmas balls. She really explains how color and texture work. I say yes.
Check out Myles of Style.
Friday, January 9, 2009
Your Own Gypsy Robe

There is a tradition on Broadway.
Gypsy Robes are made up of scraps and pieces from and representing hundreds of Broadway Shows of yore. The actor/singer/dancer in the chorus of each show that opens who has been in the most Broadway Shows gets to wear the Gypsy Robe with a scrap from her or his show most recently added.
I remember my first show T-Shirt. I wore it with pride, created outfits around it, never dried it in the dryer. Fast forward __ years and umpteen shows and bands later and I had too many t-shirts crammed in the back of my drawers, most oversized and style-free. What is a Broadway Diva to do?
Why, make his or her own Gypsy Robe, of course!
You can make a quilt, of course, but why not surround yourself with your memories while you're getting ready for your next show?

This project is not for the faint of heart. It takes hours and the guts to cut into your beloved t-shirts. First, find a robe, new, one you own or at a resale shop. Mine was a second hand terry cloth with a nice weight to it. Notice I cut small shapes out of remaining t-shirt fabric to fill out the design. Leave plenty of fabric around each emblem to fold under in a hem and then pin on your robe, rearranging and pinning it until it looks right. Handsew your theater history in place using a slip stitch.
Et voila! Your own Gypsy Robe!
Oh, and also, make sure you leave room for your next show t-shirt...
(pictured here is my gypsy robe on the stage of the Barrymore during warmup with the cast of "Company")
It's a Girl! And another girl!

My friend is having twins!
And I was invited to the shower and I hadn't shopped yet. I was about to log onto her registry, but then I thought, that's not What Leenya Would Do. See what I've gotten myself into?
If you don't want to sew baby clothes from scratch (pretty fun as it's all in miniature!), find some simple white cotton onesies or p.j.s from a baby store. You can even buy them in packages of multiples so if you mess up, you're okay! Or if your friend is having twins, you can make 2 outfits!
There are so many ways to personalize your friend's baby clothes. One of her friends painted onsies with the Actor's Equity Logo! Fabric paint is pretty easy to use and set with heat. You can make a stencil, sketch with pencil first, or just paint free hand. (see my former post, Inspiration for more details)
I like the look of appliques of colorful t-shirt fabric swatches (shown here), hand-sewn in large visible contrasting thread. Or just use embroidery alone. I made each little shirt slightly different. It was fun to think of them wearing them as I stitched each flower.
Another idea is to give a gift certificate for baby sitting. That's worth a night out for your parents-to-be and could be fun for you, too.
Friday, December 19, 2008
Ornaments that Complement
 If you've been reading my blog from the beginning, then you should feel like you already know my friend Chad. I wanted to include a photo of his living room this Christmas as he not only has a great sense of design and love of all things holidays, but he does it all on a budget with stoop sale finds and antique shops. Pictured here are decorations that caught his eye, but are mostly chosen carefully to fill out a color scheme.
 Merry Christmas to you all and here's to a creative and rich-in-spirit 2009!
Don't forget to take my Resolutions poll...
Tuesday, December 16, 2008
Show Off!
 Go on, admit it! You're popular! So why not display your Christmas Cards for all to see?
 There are probably many ways to make them part of your Holiday decor, but here is one of the simplest: Tack a fun ribbon across a room and hang your cards like they're clothes of love and praise out to dry in the light of the season.
Saturday, November 29, 2008
Inspiration
Where do you get yours?


 So the best thing to do once you've decided on an inspiration is to find a practice scrap. I like to paint freehand, but stencils and sketching out your design with a washable pencil is a great option. Mistakes are difficult to wipe off. I compare this process with music improvisation, where turning your mistakes into brilliant choices and uniqueness is key.


 Pictured here are my own projects and experimentation with this design technique: a jean jacket and jeans. They have held up to machine washing. For my Holiday gifts this year, I am considering sewing some napkins (use 100% cotton fabric)(lots of hemming, but pretty easy once you get used to the first one) and then painting the corners in simple designs, each slightly different like the Central Park Wall stone work above. The thing about cloth napkins, too, is that it cuts down on the amount of paper towels that fill land fills. I love using them every day.


In this post, I'll be talking about finding ideas for designs for painting Christmas gifts.
 With fabric paint, you can personalize just about anything: Napkins, aprons, jeans, t-shirts, things you can buy inexpensively and spruce up in your own way. Metallic paints (available at most arts and craft stores) provide the best color saturation and show up on most fabrics. With such paint brands as Lumiere by Jacquard and Delta Glitter Stuff for fabric, the sky is the limit. Add Aleene's OK to Wash-It Fabric Bond glue and fake jewels and beads can be added to the mix.
 With fabric paint, you can personalize just about anything: Napkins, aprons, jeans, t-shirts, things you can buy inexpensively and spruce up in your own way. Metallic paints (available at most arts and craft stores) provide the best color saturation and show up on most fabrics. With such paint brands as Lumiere by Jacquard and Delta Glitter Stuff for fabric, the sky is the limit. Add Aleene's OK to Wash-It Fabric Bond glue and fake jewels and beads can be added to the mix.
 So now you're staring at your blank canvas and have no idea where to start. But you can find inspiration for your designs almost everywhere you look. Here is a photo of one of my house plants. Leaves and berries are the basis for so many patterns. I visited a Victorian "castle" this weekend and was overwhelmed by the ornate designs that covered each surface, most with vines and leaves and flowers of some kind. Pictured to the right is wallpaper that I saw in an art deco hotel. It has such an interesting take on paisleys and swirls I had to document it. Below are photos of details of the stone wall surrounding the Bethesda Fountain in New York. Usually, the fountain gets all my attention but for some reason that day, I really studied the other stone work. I realized that I have walked past these amazing designs for years without noticing that though the wall is fairly symmetrical and seemingly repetitive, each of these little stone carvings is slightly different, it's own gorgeous ornate design.
So the best thing to do once you've decided on an inspiration is to find a practice scrap. I like to paint freehand, but stencils and sketching out your design with a washable pencil is a great option. Mistakes are difficult to wipe off. I compare this process with music improvisation, where turning your mistakes into brilliant choices and uniqueness is key. Finishing requires air drying (read the directions on the bottle for drying time) and then ironing to set. The end result of a painted design is less time consuming than embroidery and can be more striking or more subtle, depending on your color choices.
 Pictured here are my own projects and experimentation with this design technique: a jean jacket and jeans. They have held up to machine washing. For my Holiday gifts this year, I am considering sewing some napkins (use 100% cotton fabric)(lots of hemming, but pretty easy once you get used to the first one) and then painting the corners in simple designs, each slightly different like the Central Park Wall stone work above. The thing about cloth napkins, too, is that it cuts down on the amount of paper towels that fill land fills. I love using them every day.
Have fun! Let me know where your design inspiration comes from!
Monday, November 24, 2008
Deck the Halls
 No, I'm not going to write about cutting snowflakes out of newspaper or stringing popcorn and cranberries to trim your tree, though those are always cheap, fun ways to start decorating for the holidays. Today I'm posting about your next step: Overstock and 99 Cent Stores.
 Okay, who hasn't been to Jack's World?
There are two: One at 110 W. 32nd St. between 6th and 7th and the other at 45 W. 45th St. between 5th and 6th Ave. and if you're looking for unique and practically free Christmas decorations and gifts, run, don't walk! It is also great for beauty products and gourmet food items, believe it or not, but in this post, I'm talking holidays.
Obviously you'll look for tree ornaments (you never know what you'll find), wrapping paper and gift bags (more than half the regular price), gourmet candy and chocolate, and stockings (I found the cutest beaded ones this year for 9.99!) but there is

also a plethora of garlands and faux greenery (pictured here in both photos). Rifle through the linens as well, as table runners (pictured here adorning my living room mirror) can be used creatively. Some years, there is an extra amazing selection of tree skirts in modern designs. I bought three
boxes of Christmas Ball ornaments a couple of years ago that I pile into my large assortment of vases from opening nights gone past and create festive holiday sculptures (an idea I stole from my sister-in-law, Marie). Instead of your standard red and green, I've chosen purple, terra cotta, and gold for my holiday accents. Silver and blue are another creative alternative.
Don't forget to score the aisles of kitchenware and toys
for your Christmas list. With all the bargains, it's easy to forget what you came for, but go any other time besides lunch hour and after work and you won't feel overwhelmed.
While you're there, pick up some clothespins (most likely a packet for 99 cents) and some festive ribbon to string across your apartment (idea courtesy of my friend Elizabeth). Hang your holiday cards from it instead of stuffing them in a drawer this year. The cards add a holiday flair and every day, you'll be reminded how popular you are! My holiday gift to you: I've given you yet another way to multitask!

Subscribe to:
Posts (Atom)